The UrBlog

John's Ramblings about Software Development

Using ECMAScript 6 in Grails

I’ve been writing a lot of JavaScript lately. I like to apply the same engineering principles to my JavaScript code that I apply to any other language so I break my code up into separate clases and modules, each in their own file. If I’m writing code using Node, I use browserify or RequireJS to help manage this. On Grails projects I used the resource plugin in the past. Lately I’ve started using the asset-pipeline plugin.

I also use JavaScript constructor functions often, especially when using AngularJS. While it’s a bit clunky to code prototypes this way, browser VMs optimize for that pattern and Angular uses it often.

I’ve been interested in using ECMAScript 6. I like how it simplifies creating prototypes (i.e. the class keyword) and the built in module support. I found a tool called Babel that translates ES6 to readable ES5 code that runs in the browser. It’s easy to plugin into browserify in a Node project. I wanted to start using it in Grails so I created a new asset-pipeline plugin called es6to5-asset-pipeline. (It’s called es6to5 because when I started it, babel was called 6to5).

Usage is simple:

  1. Include the asset-pipeline and es6to5-asset-pipeline plugins in your project
  2. Name your JavaScript files with the extension .es6

The plugin will run each file thru babel, wrap the results in an IIFE and convert the CommonJS style requires and exports into something that will work in the browser.

One of the goals I was able to accomplish was reading the ES6 import lines to figure out what files to require before processing the current file. The asset-pipeline needs the following at the top of your JavaScript file to tell it what files this file depends on:

1
//= require app/controller/homeCtrl.js

I was able to get my plugin to process the import statements; so instead of this ES6 code:

1
2
//= require app/controller/homeCtrl.es6
import HomeCtrl from /app/controller/HomeCtrl.es6

You can leave out the require and avoid the duplication:

1
import HomeCtrl from /app/controller/HomeCtrl.es6

There is more documentation available on github. Please give it a try and let me know what you think. So far I’ve only used it on a few small personal projects so I’d love to get some folks testing it out.
Angular Routers in Large Projects

Intro

If you read the Angular Tutorial section on the router you will find what amounts to a large switch statement. Here’s the example code from the tutoral:

1
2
3
4
5
6
7
8
9
10
11
12
13
14
phonecatApp.config(['$routeProvider', function($routeProvider) {
  $routeProvider.
    when('/phones', {
      templateUrl: 'partials/phone-list.html',
      controller: 'PhoneListCtrl'
    }).
    when('/phones/:phoneId', {
      templateUrl: 'partials/phone-detail.html',
      controller: 'PhoneDetailCtrl'
    }).
    otherwise({
      redirectTo: '/phones'
    });
}]);

A diligent programmer might build a service around this to provide methods to switch routes or to provide constants for the routes.

1
2
3
4
5
6
7
8
9
10
11
12
13
14
15
16
17
18
(function(app) {

  var PHONE_ROUTE  = '/phones';

  app.config(['$routeProvider', function($routeProvider) {
    // config routes (see previous example)
  }]);

  app.service('RouteService', ['$location', function($location) {
    this.goToPhoneList = function() {
      $location.path(PHONE_ROUTE);
    };
    this.goToPhoneDetails = function(phoneId) {
      $location.path(PHONE_ROUTE + '/' + phoneId);
    };
  }]);

}(phonecatApp));

This is not a big deal for a small project with a couple of routes. As your application grows, you’ll find this file needs to be updated everytime a route is added. These methods to navigate to a route will start to contain logic that should be in a controller. Image what this file would look like with 30 routes?

Let’s apply some Object oriented design to our problem. One way to manage our dependencies is to use the Open Closed Principle; we want to make our RouterService open for extension but closed for modification. The $routeProvider gives us some help here. We don’t need to add all our routes in one block of code. Since routes tend to match up to controllers, why not add it in the code file with it’s controller?

1
2
3
4
5
6
7
8
9
10
11
12
13
14
15
16
17
18
19
20
(function(app) {

  var PHONE_LIST_ROUTE = '/phones';

  app.controller('PhoneListCtrl', function() {
    // controller code here
  });

  app.config(['$routeProvider', function($routeProvider) {
    $routeProvider.
      when(PHONE_LIST_ROUTE, {
        templateUrl: 'partials/phone-list.html',
        controller: 'PhoneListCtrl'
      }).
      otherwise({
        redirectTo: PHONE_LIST_ROUTE
      });
  }]);

}(phonecatApp))

We still have the issue of those methods on the RouterService itself. We should move those to the file with the controller. This keeps the logic concerning what happens when you try to route to a controller together with the controller. We can take advantage of that fact that JavaScript is a dynamic language by defining a simple service and adding methods on the fly.

First start with a simple service. Notice it is just an empty object. We’ll extend it as we go.

1
2
3
(function(app) {
  app.value('RouterService', {});
}(phonecatApp))

Now after we’ve setup our controller and $routeProvider, we can add the goto method.

1
2
3
4
5
6
7
8
9
10
11
(function(app) {

  // controller def

  // route config

  app.run(['RouterService', '$location', function(RouterService, $location) {
    Router.goToPhoneList = function() { $location.path(PHONE_LIST_ROUTE); };
  }]);

}(phonecatApp));

Using this pattern, I can now add or change code for routes in a single file. The route details, the controller and a go to method are all together. More importantly, multiple developers can now work on a large application with dozens of routes without constantly having conflicts on that RouterService.

Prototypal JavaScript

Intro

I was watching the Advanced JavaScript course on Frontend Masters and Kyle brought up his concept of “OLOO” (objects-linked-to-other-object). It reminded me of a blog post by Keith Peters a few years back on Learning to live without “new” where he explains using prototypal inheritance instead of constructor functions. Both are examples pure prototypal coding.

The Standard Way

The way we were taught to create objects in JavaScript is to create a constructor function and add methods to the function’s prototype object.

1
2
3
4
5
6
function Animal(name) {
  this.name = name;
}
Animal.prototype.getName = function() {
  return this.name;
};

To create a sublcass, we create a new constructor function and set it’s prototype to the parent prototype. To call the parent constructor, we need to call it passing in this as the context object.

1
2
3
4
5
6
7
8
9
10
function Dog(name) {
  Animal.call(this, name);
}
Dog.prototype = Object.create(Animal.prototype);
Dog.prototype.speak = function() {
  return "woof";
};

var dog = new Dog("Scamp");
console.log(dog.getName() + ' says ' + dog.speak());

The Prototypal Way

If you’ve had any exposure to prototypal languages, the above example will look strange. I’ve tried out the IO language which is a prototype based language. In a prototypal language, you create a prototype by cloning Object and adding methods and properties to it. You can then clone that prototype to create instances to use or you can clone it to create a prototype that you can extend. This is how the above example would look in IO:

1
2
3
4
5
6
7
8
9
Animal := Object clone
Animal getName := method(name)

Dog := Animal clone
Dog speak := method("woof")

dog := Dog clone
dog name := "Scamp"
writeln(dog getName(), " says ", dog speak())

The Good News

We can code this way in JavaScript! The Object.create function is similar to IO’s clone. Here’s a pure prototypal implementation in JavaScript. Other than syntax, it’s the same as the IO version.

1
2
3
4
5
6
7
8
9
10
11
12
13
Animal = Object.create(Object);
Animal.getName = function() {
  return this.name;
};

Dog = Object.create(Animal);
Dog.speak = function() {
  return "woof";
};

var dog = Object.create(Dog);
dog.name = "Scamp";
console.log(dog.getName() + ' says ' + dog.speak());

The Bad News

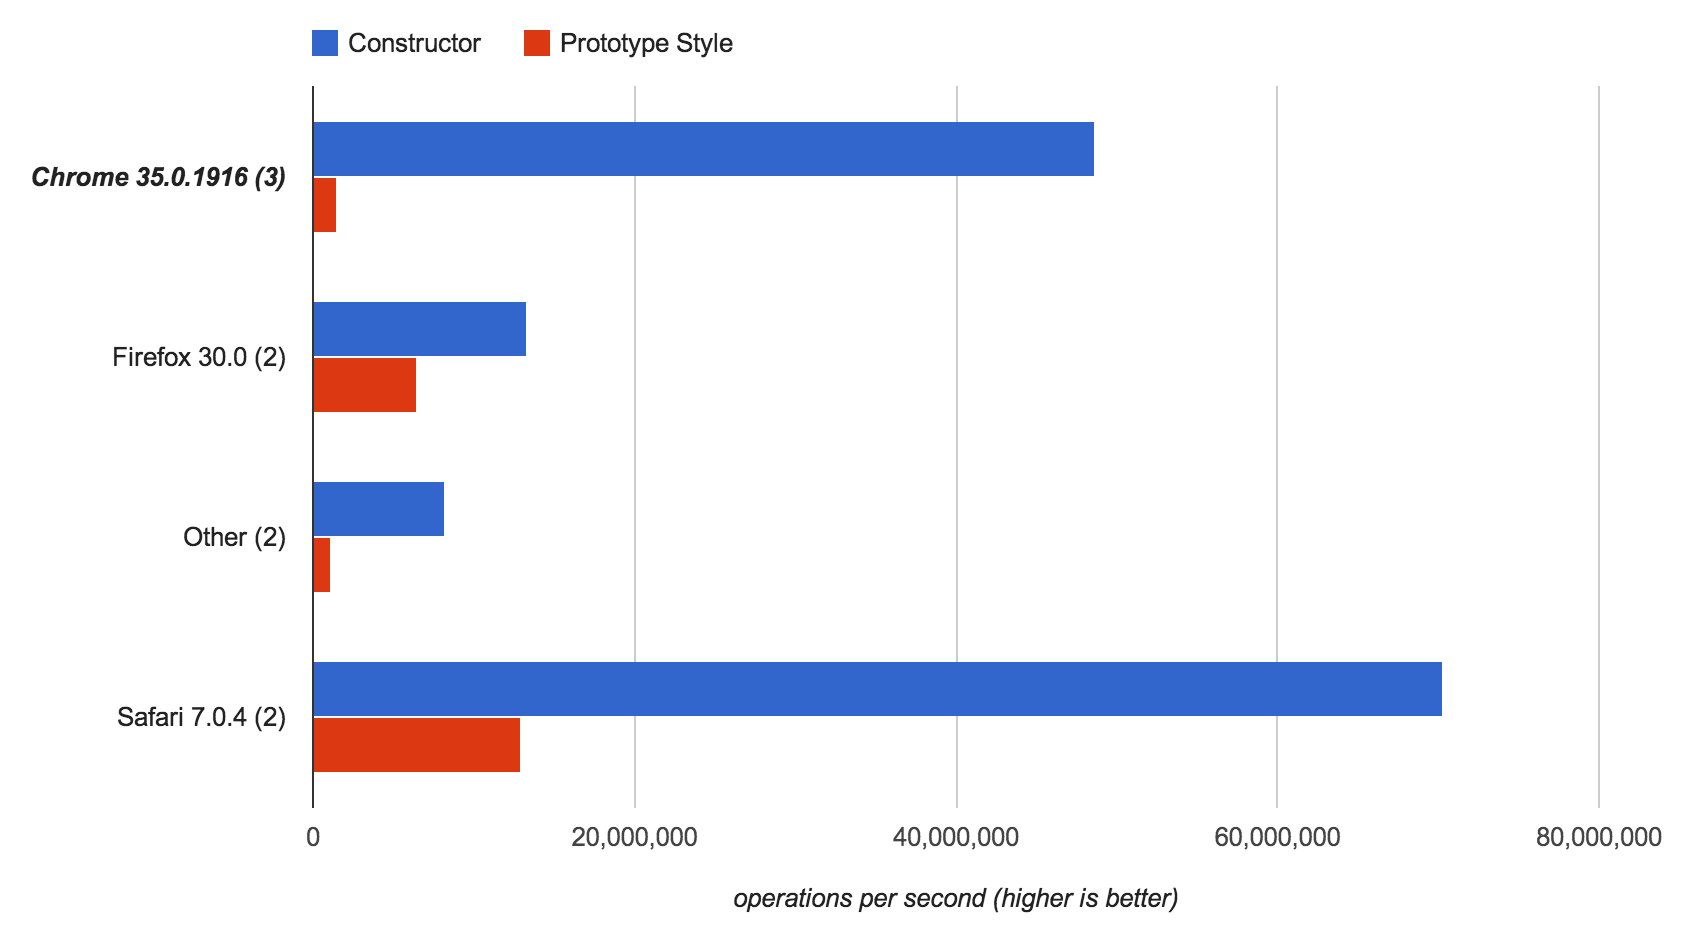
JavaScript engines have optimizations when you use constructor functions. Testing the two different options on JSPerf shows the prototypal implementation to be up to 90 times slower than using constuctors.

Perf Graph

Also, if you are using frameworks such as Angular, you have to use constructor functions when you are creating controllers and services.

Enter Classes

With ES6 we have a new class syntax. This syntax is just sugar for the standard constructor way to produce objects. It looks like we are creating classes like one would in Java or C#, but it’s still creating prototype objects under the covers. This will be confusing for people coming from class based languages as they will expect it to have the same properties as a class in their language when it’s really creating prototypes.

1
2
3
4
5
6
7
8
9
10
11
12
13
14
15
16
17
18
19
20
class Animal {
  constructor(name) {
    this.name = name;
  }
  getName() {
    return this.name;
  }
}

class Dog extends Animal {
  constructor(name) {
    super(name);
  }
  speak() {
    return "woof";
  }
}

var dog = new Dog("Scamp");
console.log(dog.getName() + ' says ' + dog.speak());

Conclusion

If I had a choice, I would always write using a pure prototypal style. It’s more expressive, dynamic and fun. Because of the way the way the virtual machines optimize for constructor functions and the way frameworks use them, production code I write will still use constructor functions. Once ES6 becomes common, I expect I’ll be using the class syntax instead as it’s easier than using constructor functions.

AngularJS and jQuery Dialogs

I’m using jQuery dialogs in an AngularJS application. I’ve struggled to find a way to use them that follows angular ‘best practices’. My first attempt used a directive for the DOM manipulation and a controller for binding to the scope. I was uncomfortable with this approach because I was splitting the code between two different artifacts. I also ended up adding the open dialog method to the $rootScope which is the same as making it global.

1
2
3
4
5
6
7
8
9
10
11
12
13
14
15
16
17
18
19
20
21
22
23
24
25
app.controller('DialogCtrl', function($scope) {
  $scope.message = 'Hello Dialog!';
  this.onSave = function() {
    alert('saved!');
  };
})
app.directive('myDialog', function() {
  return {
    controller: 'DialogCtrl',
    link: function(scope,elem,attrs,ctrl) {
      elem.dialog({
        autoOpen: false,
        buttons: {
           'Save': function() {
              ctrl.onSave();
              elem.dialog('close');
            }
        }
      });
      scope.$root.openTestDialog = function() {
        elem.dialog('open');
      };
    }
  };
});

The other method I tried was using a single controller. This was also not best practice since I was manipulating DOM in a controller. I still had to put the open method on $rootScope.

1
2
3
4
5
6
7
8
9
10
11
12
13
14
15
16
17
18
19
20
21
22
23
24
app.controller('TestDialog', function($scope) {
  var self = this,
      $dialog = $('#test-dialog');

  $scope.message = "Hello!!!";

  this.onSave = function() {
    alert('saved!');
    $dialog.dialog('close');
  };

  $dialog.dialog({
    autoOpen: false,
    buttons: {
      'Save': self.onSave
    }
  });

  $scope.$root.openTestDialog = function() {
    $scope.message = "boom";
    $dialog.dialog('open');
  };

});

Others have suggested using a service, but I would be accessing the DOM in the service and what would I do about scope?

Then I thought, what if I created a generic directive that would allow me to set the dialog options in the markup? Furthermore, what if I could register the the dialog in a service so I could inject it into a controller and open the dialog using that controller? It turns out it’s possible with a little angular black magic. Meet the jqdialog directive.

Step one: create directive that provides the jQuery dialog options as scope variables. I capture the options directly off the $.ui.dialog and then add them to the scope using ‘&’ bindings. This allows any values to be entered without having to convert from strings with the downside of having to place strings in quotes inside the attribute. Then in the link function, I can loop thru the options, and if they have values on the scope, I put them in the options array which is passed to the dialog function.

1
2
3
4
5
6
7
8
9
10
11
12
13
14
15
16
17
18
19
20
21
22
23
24
25
26
app.directive('jqdialog', ['$injector', function($injector) {
  var options = Object.keys($.ui.dialog.prototype.options);
  return {
    scope: options.reduce(function(acc, val) {
      acc[val] = "&"; return acc;
    }, {
      onOpen: "&",
      onClose: "&",
      buttonClasses: "&"
    }),
    <...>
    compile: function(elem, attrs) {
      <...>
      return function(scope, elem, attrs, ctrl, transclude) {
        var opts = options.reduce(function(acc, val) {
              var value = scope[val] ? scope[val]() : undefined;
              if (value !== undefined) {
                acc[val] = value;
              }
              return acc;
            }, {}),
            dialog = elem.dialog(opts);
            <...>
      };
    };
});

Step two: require a dialogName attribute and use that to create a service for the dialog with open and close methods. We’ll need to create the service in the compile function so it will be available when dependencies are injected. Then we’ll add the methods in the link function when the scope is available. Finally, we must call the transclude method using the $parent scope instead of ng-transclude so we get the correct scope for contents in the dialog.

1
2
3
4
5
6
7
8
9
10
11
12
13
14
15
16
17
18
19
20
21
22
23
24
25
26
27
28
29
30
31
32
33
34
35
36
37
38
app.directive('jqdialog', ['$injector', function($injector) {
  <...>
  return {
    <...>
    compile: function(elem, attrs) {
      app.provide.service(attrs.dialogName + 'DialogService',
                ['$q', function($q) { this.q = $q; }]);
      return function(scope, elem, attrs, ctrl, transclude) {
        var service = $injector.get(attrs.dialogName + 'DialogService');
        <...>

        service.openDialog = function(options) {
          var onOpen = scope.onOpen();
          this.dfd = this.q.defer();
          if (onOpen) {
            onOpen(options);
          }
          dialog.dialog('open');
          return this.dfd.promise;
        };

        service.closeDialog = function(data) {
          var onClose = scope.onClose();
          if (onClose) {
            onClose(data);
          }
          dialog.dialog('close');
          this.dfd.resolve(data);
        };

        transclude(scope.$parent, function(clone) {
          elem.append(clone);
        });

      };
    }
  };
}]);

The full version is available on github. Here is an example of the tag usage.

1
2
3
4
5
6
7
8
9
10
11
<div ng-app="app" ng-controller="DemoCtrl">
  <button ng-click="testDialog();">Open Dialog</button>
  <jqdialog dialog-name="Test" title="'Test Dialog'"
            auto-open="false" width="400" height="300"
            on-open="onOpen" buttons="{'OK': onOk, 'Cancel': onCancel}"
            ng-controller="DialogCtrl">
    <h3>This is a test dialog</h3>
    <label for="fullName">Full Name:</label>
    <input id="fullName" ng-model="fullName"/>
  </jqdialog>
</div>
1
2
3
4
5
6
7
8
9
10
11
12
13
14
15
16
17
18
19
20
21
app.controller('DemoCtrl', ['$scope', 'TestDialogService', function($scope, TestDialogService) {
  $scope.testDialog = function() {
    TestDialogService.openDialog().then(function(result) {
      if (result.ok) {
        alert('You entered ' + result.name);
      }
    });
  };
}]);
app.controller('DialogCtrl', ['$scope', 'TestDialogService', function($scope, TestDialogService) {
  $scope.fullName = "Test";
  $scope.onOpen = function() {
    $scope.fullName = "";
  };
  $scope.onOk = function() {
    TestDialogService.closeDialog({ok: true, name: $scope.fullName});
  };
  $scope.onCancel = function() {
    TestDialogService.closeDialog({ok: false});
  };
}]);

I’ve started an angular.jquery project on github to hold this and other jQuery directives. If you have any directives, feel free to contribute

Complexity and Angular DI

We chose AngularJS as our primary JavaScript framework and I’ve had the opportunity to use it heavily in a project. While controllers and directives are cool, I find the dependency injection to be overly complicated. There are many different ways to provide objects to inject: provider, factory, value, service and constant. In the end, most of these are shortcuts that do the same thing. The following example is modified from the angular documentation and creates a simple alert function that can be injected through angular DI.

1
2
3
4
5
6
7
8
9
10
11
12
13
14
15
16
17
18
19
20
21
22
23
24
25
26
27
28
29
30
31
var app = angular.module('app', []);
// Using a provider:
app.provider('greeting', ['$window', function($window) {
  this.$get = function() {
    return {
      alert: function(name) {
        $window.alert("Hello, " + name);
      }
    };
  };
}]);
// Using a factory:
app.factory('greeting', ['$window', function($window) {
  return {
    alert: function(name) {
      $window.alert("Hello, " + name);
    }
  };
}]);
// Using a service:
app.service('greeting', ['$window', function($window) {
  this.alert = function(name) {
    $window.alert("Hello, " + name);
  };
});
// Using a value:
app.value('greeting', {
  alert: function(name) {
    alert("Hello, " + name);
  }
});

There are a few minor differences: the service takes a constructor to create the object, while provider and factory take the results of calling a function for the object. Value takes the object and provides no dependency injection. Otherwise, these are all creating exactly the same module.

Contrast this to creating modules using AMD. In the past I’ve used either RequireJS or define.js as libraries to add AMD to my projects. I use them mostly as a way to organize my code, but I get a form of dependency injection also. When using RequireJS, I can add Squire.js to mock module dependencies. define.js includes this ability in the library. AMD has the dependencies “injected” into the module. The only difference from AngularJS is that they are injected when the module is loaded. Here’s the same module created using AMD:

1
2
3
4
5
6
7
define('greeting', ['window'], function($window) {
  return {
    alert: function(name) {
      $window.alert("Hello, " + name);
    }
  };
});

Here’s a test for the angular code using the angular mock library:

1
2
3
4
5
6
7
8
9
10
11
12
13
14
15
16
17
18
19
20
define("Greeting module", function() {

  var mockWindow, service;

  beforeEach(function() {
    mockWindow.alert = jasmine.createSpy();
    module('app', function($provide) {
      provide.value('$window', mockWindow);
    });
    inject(function($injector) {
      service = $injector.get('greeting');
    });
  });

  it("should show alert", function() {
     service.alert('everyone');
     expect(mockWindow.alert).toHaveBeenCalledWith("Hello, everyone");
  });

});

Here is the same test with define.js and no additional libraries:

1
2
3
4
5
6
7
8
9
10
11
12
13
14
15
16
17
18
19
20
define("Greeting module", function() {

  var mockWindow, service;

  beforeEach(function() {
    mockWindow.alert = jasmine.createSpy();
    redefine('greeting', { '$window': mockWindow });
    require(['greeting'], function(greeting) { service = greeting; });
  });

  afterEach(function() {
     redefine('greeting');
  });

  it("should show alert", function() {
     service.alert('everyone');
     expect(mockWindow.alert).toHaveBeenCalledWith("Hello, everyone");
  });

});

So AMD gives you most of the ability provided by Angular DI with only one way to do it. If you are using RequireJS, you have the added ability to automatically resolve dependencies and load them asynchronously.

Of course, you can always use both. If you treat Angular as a dependency container and build your modules in AMD, you can get to a place were you can have more fine grain organization of your code and not have to force everything that’s not a controller or directive into a service. Here’s a quick example that is setup to use no globals other than the define and require methods of AMD.

1
2
3
4
5
6
7
8
9
10
11
12
13
14
15
16
17
18
19
20
21
22
23
24
25
26
27
28
29
30
31
32
33
34
35
36
37
38
39
40
41
42
43
44
45
define('app', ['angular'], function(angular) {
  return angular.module('app', []);
});

// A utility module that doesn't need to be a service
define('app/util', function() {
  return {
    upper: function(value) {
      value.toUpperCase();
    }
  }
});

define('app/service', ['app', 'app/util'], function(app, util) {

  function Service() {
    this.name = 'service';
  }

  Service.prototype = {
    getName: function() {
      return util.upper(this.name);
    },
    setName: function(name) {
        this.name = name;
    }
  };

  app.service('MyService', Service);

  return {};
});

define('app/MyCtrl', ['app'], function(app) {

  function MyCtrl($scope, $window, MyService) {
     $scope.click = function() {
       $window.alert(MyService.getName());
     };
  }

  app.controller('MyCtrl', ['$scope', '$window', 'MyService', MyCtrl]);

  return {};
});

Unit Testing With the OneTimeData Plugin

The OneTimeData plugin is handy when flash doesn’t work for you. I recently had to use it in an application that required an extra redirect between controller actions. The OneTimeData plugin does not come with any unit testing assistance, so I created a simple mixin that adds the OneTimeData methods to a controller under test and backs them with a mock map on the spec to make it easy to access what the controller passed. The following class creates the mixin.

Using it requires two steps: 1) Add the mixin using the @TestMixn annotation and 2) call mockOneTimeData passing in the spec and the controller.

If anyone knows of a way to capture the spec and controller inside the mixin, please comment. Thanks!

Creating Grails UI ‘Components’

I’m working on a Grails application with a large amount of JavaScript. I often have UI ‘components’ that have markup, CSS and JavaScript associated with them that are used on several pages. A couple of examples are shopping carts and dialogs. I’ve found a good way to organize this code is to make use of the resources plugin to put the pieces together into modules that I can then place into the pages. As an example, I made a simple dialog that has a GSP for the layout, a CSS file with some styling and JavaScript to open the dialog. The first step is to create some markup for the dialog in a template:

I added a require at the top to pull in the module definition from the ApplicationResources file. This will pull the CSS and JavaScript for the component in each page that uses the template.

A little CSS and JavaScript will bring the component to life:

I can now include the template on the page and all the pieces of my component are pulled in. I can now open the dialog from my page.

Roll Your Own Controllers With Express and Require.JS

I’m a Grails developer at work, so I’ve gotten used to convention over configuration for controllers. I just create a class with a name that ends in Controller and place it the controller folder. Each method in the controller is an action and it allows me to access that method via /controller/action/id.

While Node and Express have full blown Rails copies (such as Geddy), I want something simpler. I prefer to use Require.JS to help me manage my dependencies. It includes a require method that allows me to load a module by name.

This gave me an idea. What if I could make a /controller/acton/id route in Express and use require to dynamically load the controller. I could then call the action on the controller as a key. It turns out it’s pretty simple:

Now any module in app/controller that has a method that takes a request and response can act as a controller with no configuration. This example responds to /health/index. Since we set it up to go to index when there’s no action, it will also respond to /health.

There are cases where your URL does not match /controller/action. Grails allows you to setup a UrlMapping file that maps URLs to controllers. We could setup a similar file in JavaScript:

We can then loop thru the mappings and register them with Express:

With just Express, Require.JS and a few lines of JavaScript, I now have convention over configuration controllers

A Simple JavaScript Module Library

When developing JavaScript, I like to break my code into modules and define what modules the depend on. Require.JS is a great tool for this, but it also means bringing in module loading. I’m on a project using Grails that has a moderate amount of JavaScript. Grails provides a resource plugin that handles bundling of resources. I would still like to use the Require.JS style of defining modules and their dependencies while still loading scripts the normal way so Grails is happy.

I ended up creating define.js. This libary provides a simple ‘define’ and ‘require’ method. The ‘define’ uses the global object to hold the modules so they are also available in html handlers. Using the global object as the module list also allows us to treat third party libraries such as jQuery as dependencies.

The following example creates a module that depends on the domain.person module, jQuery and the window object. Since we are using the global to store modules, we can treat jQuery and window just like any other dependency we have defined.

Using the global object to hold modules also allows us to access them in html

Running the Require.JS Optimizer in a Grails Build

The Grails Resource Plugin provides some dependency management for your JavaScript resources by allowing you to define modules of scripts, including their dependencies. This works fine for applications with small numbers of JavaScript. If you’re writing an application with a large amount of JavaScript, having to keep those dependencies in sync in a separate Groovy config file can get difficult. Enter Require.JS. Require.JS is an Asynchronous Module Definition (AMD) API for JavaScript. It allows you to define modules in JavaScript, including what modules it depends on. The module loader will then load the dependencies when needed. This is easier to manage in a large JavaScript project since you define the dependencies in each JavaScript file.

Require.JS comes with an optimizer that will crawl thru all your code, evaluate the dependencies, merge them into one file and minimize it. The optimizer code is in a JavaScript file that can be run using Node.JS or Rhino. We would like to run this as part of the Grails build during the war command.

The Grails war command will copy the resources for the war file into a staging directory. Before the war file is built, we will get a “CreateWarStart” event which gets the war name and the staging directory. This is where we can call the optimizer command. Following is an example that can be placed in our _Events.groovy script. It assumes you’ve placed the Rhino js.jar and the Require.JS r.js optimizer script in the Scripts folder.

We run the script using the Java command instead of ant.java to avoid any issues from code loaded by Grails. The scripts are run from the project root, so we reference the js.jar and r.js files in the .\Scripts directory. The JavaScript files will be copied to the stagingDir in the js folder. We’ll set the baseUrl to that directory and output the build file there also. While the example does not show it, you can also pass removeCombined=true to remove the JavaScript files that were combined.

The final step is to update our GSP file so it uses the -build version of the main script. Following is an example of the script line adds -build if we are running in a war